Custom Domain + HTTPS + GITHUB + CLOUDFLARE
Setting up HTTPS on a Custom domain hosted at Github Pages and secure it with Cloudflare.

Google wants us to use https to rank our site, they prioritise HTTPS over HTTP and when you are hosting your personal website/blog site on Github you should use https.
With CloudFlare DNS service and your Github custom domain this will speed up your site and make it load faster on the browser since CloudFlare is going to cache your site and service the request from the nearest cached site your site will load much faster.
I have been at this point where I want to migrate from my Github Pages blog from http to https for the obvious advantages of using https,
- HTTPS is a secure way to communicate to your site.
- HTTPS is 70% faster.
- You are in the SEO game with HTTPS.
From Github blog
HTTPS (most recognizable as the lock icon in your browser’s address bar) encrypts traffic between GitHub’s servers and your browser giving you confidence that the page you asked for is the page you’re reading, from the site you think it is, and that others can’t snoop on or modify its contents along the way.
This led me to search google and the solution was well hidden in on one of the Github issues hence I am making this ready guide for reference.
Github has native support for *.github.io domains from 2016. They finally enabled https support for a custom domain in 2018 partnering with Let’s Encrypt as the certificate authority.
Benefits of using Github?
- It’s Superfast
- Easy to setup
- site deployment is just a
git pushaway. - and has braved the worlds biggest DDOS attack.
Benefits of using CloudFlare
- Speed up your site.
- Fast, Global CDN.
- Ensure Application Availability
- Auto minify your site
- custom redirect rules.
I am assuming you have your Github account handy and now you need to go ahead and make your Cloudflare account. If you have never set up Github pages, please follow this guide to help you with.
once ready. Let’s
Configure Github Pages
Go to your Github repository and settings, we need to make sure our repository using the custom domain name and using https.
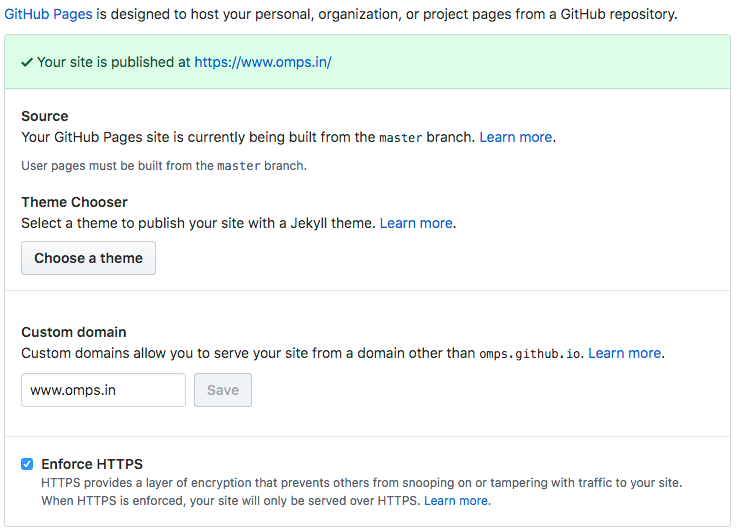
Save. That’s it and we are done.
Configure Hosting Providers DNS Server.
If you are using CNAME or ALIAS records for your custom domain, you’re all set and your site should be accessible over HTTPS. If it is, and your site loads correctly over HTTPS.
In case you are using A record Github requires you to modify your registrar’s A records to match with new IP addresses.
If you have previously configured Github pages, you could recall that for HTTP requests GitHub uses the following IP addresses.
1
2
192.30.252.153
192.30.252.154
and this needs to be updated with the new https record which GitHub provides as.
1
2
3
4
185.199.108.153
185.199.109.153
185.199.110.153
185.199.111.153
and should look like this
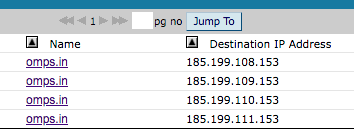
run dig command to check if the records are updated. omps.in$ dig +noall +answer omps.in omps.in. 300 IN A 104.31.70.126 omps.in. 300 IN A 104.31.71.126
after this, you need to remove the CNAME file from your repository and do a GitHub push. re-add the cname fine and do a git push to the master. This will help refresh Github’s CNAME record.
Configuring CloudFlare
Login to CloudFlare and set up a new site, for our custom domain name. In the end, we need to update our hosting provider’s domain name settings to use CloudFlare DNS instead of the current ones. CloudFlare will then import all our existing configuration on to their servers.
Just ensure that www CNAME record redirects to your GitHub pages URL. CNAME is just an alias. In this case, we tell DNS to respond address of omps.github.io whenever www.omps.in is queried.
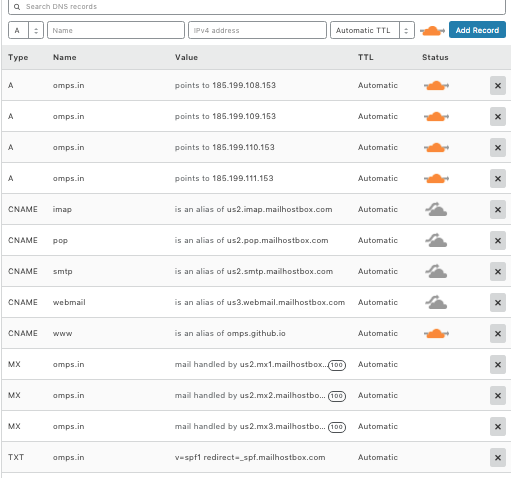
Forcing HTTPS
Now that CloudFlare handles our DNS, we need to force all requests to use HTTPs. On the Crypto tab, just change the SSL option to Full. To better understand each of these options, here is a picture taken from the CloudFlare blog:
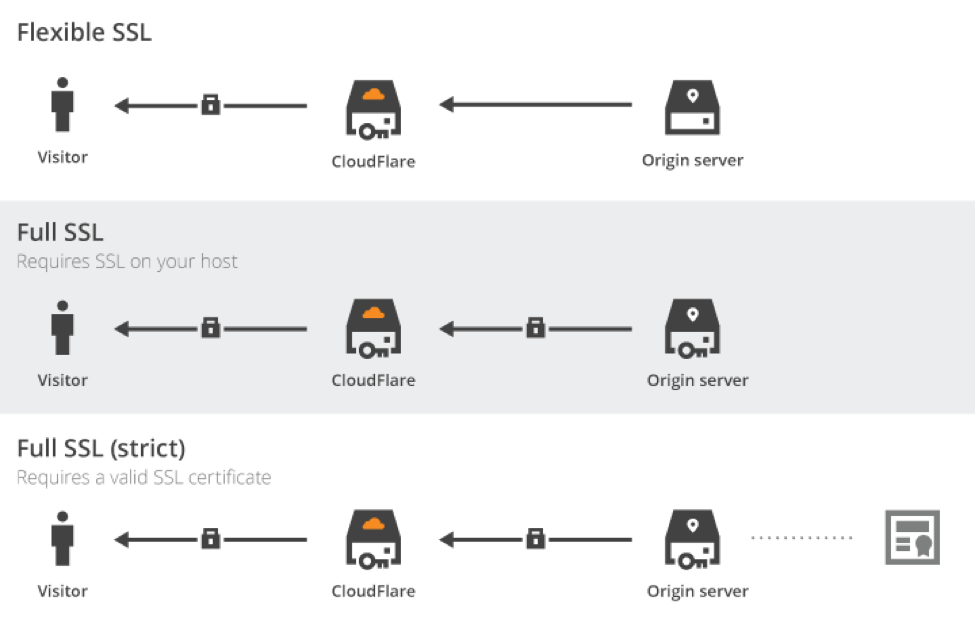
With flexible SSL, all communications between CloudFlare servers and GitHub ones are not encrypted. Not really secured, even if your domain would be served in HTTPs.
However, full modes encrypt all communication streams, even behind CloudFlare servers. In this case, the hosting server needs to supports SSL. We need to stay in loose mode, as GitHub won’t validate the SSL certificate with a custom domain name.
Our site is now (depending on DNS propagation time, up to 48 hours) served in HTTPs and is compatible with faster HTTP/2.
Force Redirection to HTTPs Version
We are going to add three rules for our domain (fortunately, we get three free rules with the free plan):

First one enables caching on all URL, Second one redirect permanently URL without www to the one with www, Last one to force the use of https everywhere. As a result, even if we mistakenly go on http://www.omps.in, we will be redirected to a cached version of https://www.omps.in.
Note the use of the wildcard * on all rules to match every URL. You can retrieve the value replaced by the wildcard using the regex-like [$1, $2, …] arguments.
About CloudFlare Caching
CloudFlare is also a CDN (Content Delivery Network). It has a lot of servers around the world and optimizes the way it delivers our data. To take advantage of it, we just had to enable caching using page rules. We can configure it more finely via the Caching tab.
We cache every request to GitHub for 4 hours (by default). Instead, all our requests would be served by the closest CloudFlare CDN server, saving fractions of seconds of international data transit. Our static website is already blazing fast, let’s increase again its reactivity.
As we asked for a total cache, we need to purge cached pages at each change. We can either do it using CloudFlare built-in API or manually. As I don’t publish several posts a day, I can wait a few hours before seeing my post is publicly available. Or I just purge the cache using CloudFlare user interface.

Note there is also a Development Mode feature. It simply disables the cache layer, allowing you to check in realtime all your changes. It is especially useful if you need to debug in production. But nobody does this kind of thing, right? ;)
Now once again we collect the CloudFlare nameservers,

go back to our hosting provider and update the NS records.
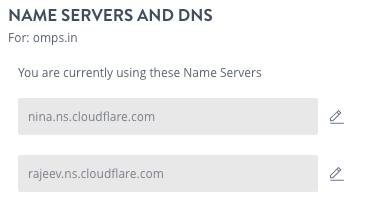
While going through this is pretty simple, I must warn you that it will take around 24/48 HRS for the changes to propagate fully, so don’t be impatient and wait. Once your changes are reflected, you would see a much faster response.